by Zoe Hillman

Ghostly Halloween Mixed-Media Canvas by Zoe Hillman
- Materials
- Instructions
- Tim Holtz® Distress Spray Stain: Walnut Stain
- Tim Holtz® Distress Ink Pads: Antique Linen, Old Paper, Frayed Burlap, Walnut Stain, Ground Espresso, Hickory Smoke
- Tim Holtz Distress® Rock Candy Crackle Paint
- Ranger Glossy Accents™
- Ranger Texture Paste
- Dina Wakley Media Palette Knife
- Tim Holtz Distress® Micro Glaze™
- Ranger Mini Blending Tool
- Ranger Adhesive Foam Rolls
- Ranger Non-Stick Craft Sheet™
- Ranger Heat it™ Craft Tool
- Tim Holtz Distress® Sprayer
- Ranger Artist Brush Set
- Ranger Watercolor Paper
- Tim Holtz Stampers Anonymous: #CMS060 - Slight Alterations Stamp Set, #010 - Eyechart, Stencil #027 - Halloween Stencil
- Tim Holtz Sizzix: #660968 - Ghosts Bigz Die
- Tim Holtz Grid Block
- Tim Holtz Snips Scissors
- Tim Holtz Paper Distresser
- Tissue Tape
- Dictionary Pages
- Cheesecloth
- Canvas
- Sewing Machine
Instructions

Hello everyone. I’m excited to be here at the Ranger Blog with a tutorial for a ghostly Halloween themed mixed media canvas.

1. To begin, cut a piece of Ranger watercolor cardstock (7.5 x 7.5 inches) and ink up with Old Paper and Frayed Burlap Distress Ink.
2. Ink background stamps with Antique Linen and Walnut Stain Distress Ink, lightly mist with water and stamp on the top of the cardstock. Dry with a Heat it Craft Tool.
3. Lightly blend Ground Espresso Distress Ink over the top of the base colour and stamped background.
4. Distress edges with a paper distresser tool.

5. Ink the edges with ground espresso distress ink.
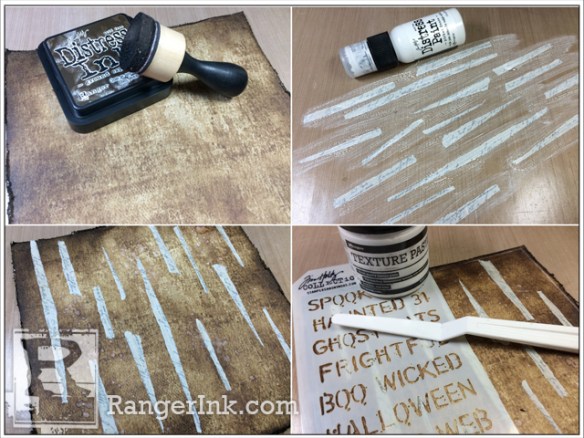
6. Tear strips of tissue tape and stick to a Non-Stick Craft Sheet. Cover with Picket Fence Distress Paint and allow to air dry.
7. Stick the strips of tissue tape to the watercolor cardstock as pictured.
8. Spread texture paste through a stencil with a palette knife, allowing to air dry before moving the stencil and repeating.
 9. Once the texture paste is completely dry cover the entire background with glazing medium.

10. Cover the sides of an 8 inch x 8 inch canvas with dictionary pages overlapping the top of the canvas slightly, using Glue ’N Seal.
11. Spray generously with Walnut Stain Distress Spray Stain (don’t worry about the middle of the canvas as this will be covered).
12. Once dry, rub Distress Micro Glaze over the stained dictionary paper and buff with a cloth.
13. Cover the canvas with Glue ’N Seal and immediately lay a piece of cheesecloth over the top, wrapping over the edges and secure at the back of the canvas with more Glue ’N Seal.

14. Die cut 2 ghosts from Mixed Media Cardstock with the Tim Holtz Ghost Bigz die.
15. Dab Picket Fence Distress Paint onto a Non-Stick Craft Sheet and spritz with water. Drag the die cut through the spritz paint and set aside to air dry.
16. Swipe Old Paper and Hickory Smoke Distress Ink across a Non-Stick Craft Sheet and spritz with water. Drag the die cut ghosts through the spritzed ink. Repeat this several times until happy with the colour streak.
17. Once dry, cut the bottom ghosts away from one die cut and ink the edges with Ground Espresso Distress Ink and repeat with the other complete die cut.

18. Paint Clear Rock Candy Distress Crackle Paint onto the ghost die cuts.
19. Cut ovals slightly smaller than the ghost heads from Mixed Media Cardstock. Cover with Glossy Accents and sprinkle Black Soot Distress Glitter over the top and set aside to air dry.
20. Apply Glossy Accents to the back of the ghost heads and stick down the glittered ovals.
21. Add black Adhesive Foam strips to the back of the ghost die cuts.
 The ghosts are now ready to attach to the canvas.
 Thanks for joining me and I hope you’ll find some time to make your own home decor pieces this Halloween.
 BOO!
BOO!


