by Jade Sutton

Summertime Flowers by Jade Sutton
- Materials
- Instructions
- Dina Wakley Media Brushes
- Dina Wakley Media Palette Knife
- Liquid Pearls™: Avocado
- Ranger Glossy Accents™
- Ranger Texture Paste
- Dylusions Ink Sprays: Fresh Lime, Squeezed Orange, Vibrant Turquoise, London Blue, Cherry Pie, Pure Sunshine, Bubblegum Pink, and Crushed Grape
- Dylusions Paint: Cut Grass, Vibrant Turquoise, Fresh Lime, and Postbox Red
- Dylusions Stencils: Shapes Large, Shattered Large
- Dylusions Journal Insert Sheets
- Dylusions Cling Mount Stamps: Basic Backgrounds, Background Love, Around the Edge
- Archival Ink™ #0 Pads: Jet Black
- Ranger Non-Stick Craft Sheet™
- Tim Holtz Tonic Craft Scissors
- Tim Holtz Idea-logy Design Ruler
- Tim Holtz 9 Grid Acrylic Blocks
- Tim Holtz Sizzix Mixed Media Thinlits Die
- Two pieces of copy/printer paper
- Baby Wipes
- Stabilio Black Pencil
- Black Fine Point Sharpie
- Sizzix BigKick Machine
- White Cardstock
- White Uni-ball Signo Pen
- Posca Black Pen
Instructions

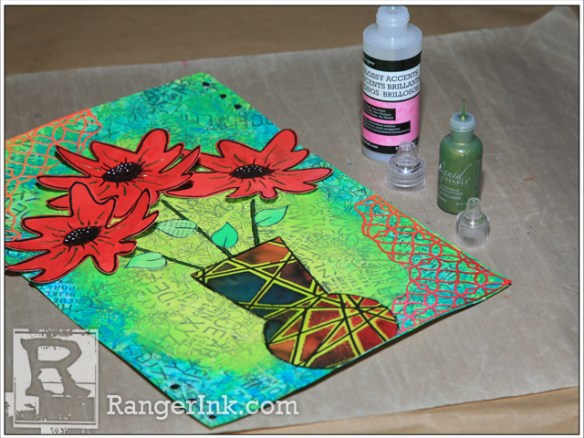
Today I want to share with you a fun summertime journal page. I hope you’ll create a page with me!

Step 1: Gather your supplies. Stamp two pieces of copy/printer paper (or any other thin paper) with Dylusions stamps using Jet Black Archival Ink.
Step 2: Tear the two pieces of paper into collage size pieces.
Step 3: Glue the collage pieces onto one Dylusions Journal Insert Sheet with Ranger’s Gel Medium.
Step 4: Cut off the excess collage papers from the edges of the Journal Insert Sheet and apply Dylusions Fresh Lime Paint all over the page with a baby wipe.

Step 5: Add Dylusions Cut Grass and Vibrant Turquoise Paint around the edges of the journal page with a baby wipe. Let the page air dry or dry with a Heat Tool.
Step 6: While the journal page is drying, let’s make the flowers. Add some Ranger Texture Paste and Dylusions Postbox Red paint to the Non-Stick Craft Sheet with a Palette Knife. You will need more texture paste than paint.
Step 7: Mix the Dylusions Postbox Red Paint and Ranger Texture Paste together. Apply the texture paste to a 5 X 8 inch piece of white cardstock through the Dylusions Flower Shape Stencil. Repeat for all three flowers.
Step 8: Remove the stencil and wash the stencil immediately because the texture paste will harden on the stencil. Let the flowers air dry.

Step 9: After the flowers are dry, cut them out with Tim Holtz’ scissors and add the flowers’ centers with a Stabilo pencil.
Step 10: While the flowers are drying, Let’s make the vase. Spray a piece of 5 X 7 inch white cardstock with Dylusions Fresh Lime Spray. Let it dry.
Step 11: Spray your favorite colors of Dylusions Ink Sprays through the 9 X 12 Dylusions “Shattered” Stencil. I used Squeezed Orange, Vibrant Turquoise, London Blue, Cherry Pie, and Crushed Grape. Let the paper air dry or dry with a Heat Tool.
Step 12: Draw black lines where the Shattered Stencil was laying using a Black Fine Point Sharpie and Tim Holtz’s Ruler.

Step 13: Trace the Dylusions Keyhole Mask on the area that you like the best.
Step 14: Cut out the keyhole/vase using Tim Holtz’s scissors.
Step 15: Cut a piece of 6 X 12 inch white cardstock into two 6 X 6 inch pieces. Spray one piece of cardstock with Dylusions Squeezed Orange and Pure Sunshine Dylusions Ink Sprays, and the other with Bubblegum Pink and Cherry Pie sprays.
Step 16: Die cut the large Tim Holtz Corner Die from each piece of sprayed 6 X 6 inch paper using your Die Cutting Machine.

Step 17: Glue the corner pieces and vase to the background with Glossy Accents.
Step 18: Add accents to the flowers with Avocado Liquid Pearls and a Posca black pen. Then add highlights to the center of the flowers with a White Uni-ball Signo pen.
Step 19: To make the leaves, add Fresh Lime, Cut Grass, and London Blue Dylusions Paint to a piece of white cardstock with a baby wipe.
Step 20: Stamp the large leaf rubber stamp on the painted cardstock with Archival Ink. Cut out the leaves.

Step 21: Glue the three flowers and leaves to the journal background. Add Avocado Liquid Pearl to the stems. Now the project is complete.


