by Bobbi Smith

Fall Triptych by Bobbi Smith
- Materials
- Instructions
- Ranger Adhesive Foam Rolls: Black
- Dina Wakley Media Palette Knife
- Ranger Ink Blending Tool & Foam
- Ranger Paper Creasers
- Tim Holtz Distress® Sprayer
- Ranger Heat it™ Craft Tool
- Ranger Mini Blending Tool
- Ranger Non-Stick Craft Sheet™
- Perfect Pearls™ Pigment Powders: Heirloom Gold and Green Patina
- Ranger Shiny Foil Transfer Sheets: Vintage
- Ranger Emboss It™ Dabber
- Ranger Sticky Embossing Powder
- Ranger Texture Paste Transparent Gloss
- Tim Holtz® Distress Ink: Ground Espresso and Antique Linen
- Ranger Sticky-Back Canvas
- Tim Holtz Stampers Anonymous THS032 Flourish Layering Stencil, Shabby French CMS087 and Ledger Script CMS241 Stamp Sets
- Tim Holtz Alterations by Sizzix-Sized Arches Movers and Shapers, Thinlits- Fall Foliage
- Tim Holtz idea-ology Sanding Grip
- FlatBack Canvas
- Chipboard
- Paintbrush
- Baby Wipes
Instructions

Hi everyone, Bobbi here! I’m so happy to be with you on the Ranger Blog today! I’m going to show you how to create a fun fall canvas home decor piece!

Step 1. Dab Spiced Marmalade, Rusty Hinge and Ground Espresso Distress Paint onto a Non-Stick Craft Sheet, and lightly mist the paint with water. Press the front of the Manila Cardstock into the paint mixture until covered. Dry with a Heat it Tool. To add more distress, pick up droplets of color off the Non-Stick Craft Sheet with manila cardstock, blotting to pick up the color (not swiping), then drying with heat tool. Repeat these steps on another piece of Manila Cardstock with Fossilized Amber, Twisted Citron and Peeled Paint Distress Paint color combinations.
Step 2: Pick sections of colorized manila cardstock and die cut 1 large and 2 medium birch leaves using Tim Holtz Sizzix Fall Foliage Thinlits die set. Splatter birch leaves with watered down Ground Espresso Distress Paint using a paintbrush. Dry with a heat tool.

Step 3. Stamp all birched leaves isolating a very small portion of the ledger script stamp using an Embossing Dabber. Generously sprinkle Sticky Embossing Powder over stamped birch leaves, then shake off excess powder from leaves. Melt Sticky Embossing Powder with the heat tool.
Step 4: Immediately adhere the champagne and chocolate colored Foil Sheets (dull side to adhesive) to melted Sticky Embossing Powder. I brushed on a very small amount of Heirloom Gold and Green Patina Perfect Pearls to all three Birch leaves after the foiling was complete. Lightly mist the Perfect Pearls with water so they will set. The Perfect Pearls are also going to stick to any small area that adhesive is still exposed on the stamped wording as well. This adds a very soft pearlescent shimmer.

Step 5. Shade outer edges of birch leaves with Ground Espresso Distress Ink and an Ink Blending Tool with foam.

Step 6. Paint 6 x 8 flatback canvas with Antique Linen Distress Paint and dry with heat tool. Apply a small amount of Rusty Hinge Distress Paint to canvas, move around color with baby wipe, then dry with heat tool. Apply a very small amount of Ground Espresso Distress Paint to canvas (concentrating mainly on outer corners) move color around with baby wipe and dry with heat tool. To add a little more interest, splatter watered-down Ground Espresso Distress Paint with paintbrush to canvas and dry with heat tool.

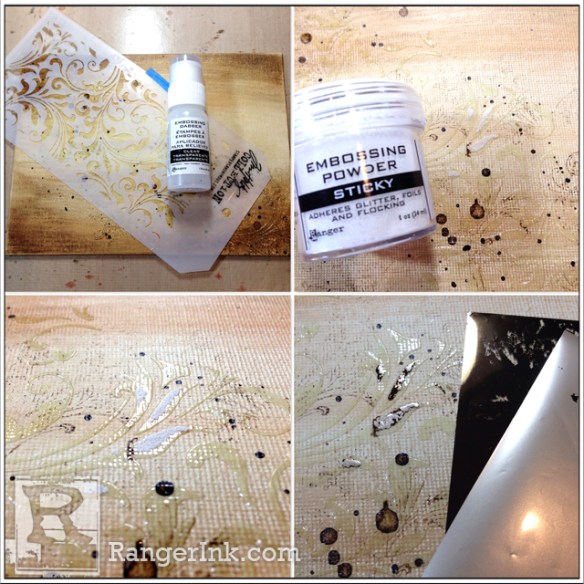
Step 7. Stamp Flourish pattern along splatters from top left-hand corner to bottom right-hand corner using Ground Espresso Distress Paint on stamp, then dry with heat tool. Immediately clean distress paint off stamp, do not let paint dry on stamp. Place the Flourish Layering Stencil (running from top left hand side to bottom right hand side of canvas). Spread a thin layer of Transparent Glossy Texture Paste through stencil and set aside to air dry. The paste is initially opaque then dries clear. You can see all the great color, stamping and splatters through the dried paste!

Step 8. After Transparent Glossy Texture Paste has completely dried, lay stencil back over canvas matching up the pattern. Using Embossing Dabber, lightly skim over small portions of flourish pattern. Lift off stencil and generously sprinkle Sticky Embossing Powder onto flourish. Shake off excess powder, then use heat tool to melt Sticky Embossing Powder. Immediately press dull side of Foil (using same color of foil as on birch leaves) to melted Sticky Embossing Powder.

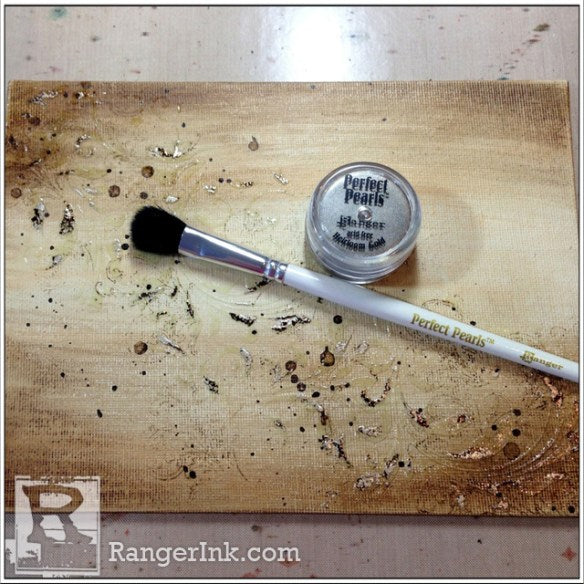
Step 9. Swirl on a light dusting of Heirloom Gold Perfect Pearls to flourish using Perfect Pearls Brush. It is going to stick anywhere, where the adhesive is still exposed. Apply a very light mist of water, then dry with heat tool.


I love the look that is achieved with the combination of the Foil and the Perfect Pearls!

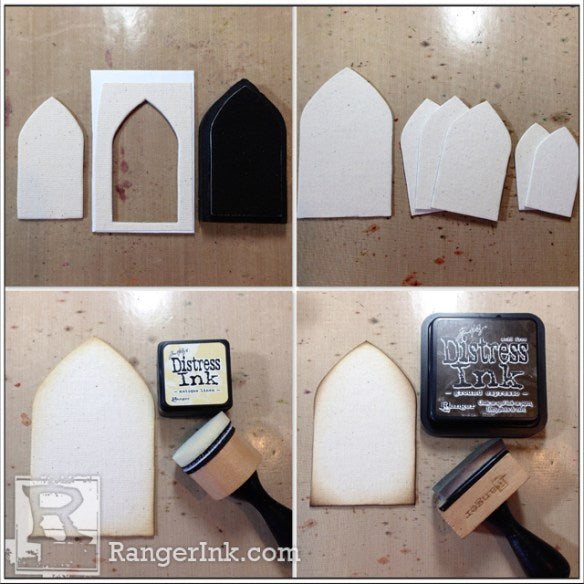
Step 10. To achieve great texture, I love using the Sticky Back Canvas! Apply Natural Sticky Back Canvas to chipboard, so it creates a sturdy work surface. Die cut one large arch, three medium arches and two small arches using Tim Holtz Sizzix-Sized Arches Die Set. Shade the outside edges of all arches with Antique Linen and Ground Espresso Distress Inks with blending tool and dry with heat tool.

Step 11. Apply largest arch to center of 6×8 canvas with Black Foam Adhesive Tape, then two of the medium arches on each side of large arch with black foam tape. Then layer coordinating arches with black foam tape. Attach largest Birch leaf to center arch and medium birch leaves to the left and right arch with black foam tape.


Step 12. Apply a layer of Antique Linen Distress Paint to large 8×10 Flatback Canvas and dry with heat tool. Apply a small amount of Ground Espresso Distress Paint to corners canvas and move color around with a baby wipe, then dry with heat tool. Splatter some watered-down Ground Espresso Distress Paint onto canvas using a paintbrush, then dry with heat tool. Stamp the Ledger Script and Flourish onto canvas here and there using Ground Espresso Distress Paint, then dry with heat tool. Immediately clean distress paint off stamp. Do not let paint dry on the stamp.

Step 13. Attach the smaller 6×8 canvas, centering to the larger 8×10 canvas using black foam tape.

Love the dimension that is achieved with all the layers and great Transparent Glossy Texture Paste!

Now you are all ready for fall with this fun decor piece! I hope you’ll give it a try!


