


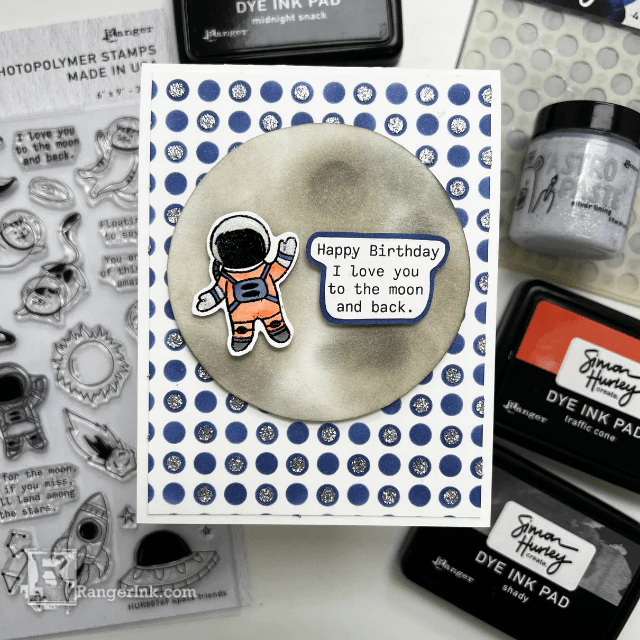
Shoot for the stars with this cosmic birthday card! Created using the latest Simon Hurley create Space Friends stamps, dye inks, and Silver Lining Astro Paste, this design features an ink blended moon, shimmering polka dots, and the cutest little astronaut.
Simon Hurley create. Space Birthday Card by Asia Alberto
- Materials
- Instructions
Simon Hurley create. Photopolymer Stamp Space Friends
Simon Hurley create. Dye Ink Pads: Midnight Snack, Shady, Traffic Cone, Woof!
Simon Hurley create. Stencil Polka Dot Assortment
Ranger Mini Ink Blending Tool Domed Replacement Foams
Simon Hurley create. Astro Paste Silver Lining
Simon Hurley create. Paste Tool Set
Simon Hurley create. Stamping Foam Circle
Tim Holtz Distress® Tiny Blending Tool
Dylusions Designer Series Stickles Stardust
Other:
Scissors
Instructions
Blast off into creativity with this fun space-themed birthday card! Using the latest Simon Hurley create products, we’ll create a bold, shimmering background and an ink blended moon. Perfect for any space lover, this card is sure to make their day out of this world. Let’s get started!

Step 1: On a 4' x 5.25' panel, apply Midnight Snack Dye Ink through Polka Dot Assortment stencil 1.


Step 2: Shift Polka Dot Assortment Stencil 1 to fill in the empty spaces, and ink with Midnight Snack. The dots should match the pattern shown in the second image.


Step 3: Apply Silver Lining Astro Paste through Polka Dot Assortment Stencil 2, layering it over the dots from step 1. Set aside to dry.


Step 4: Trace a circle on a separate piece of cardstock using the circle stamping foam. Cut it out.

Step 5: Using tiny blending tool(s), Woof! and Shady Dye Ink, lightly blend the inks to create a 'moon'. Add darker spots to create 'craters'.

Step 6: On a separate piece of cardstock, stamp and emboss the astronaut with black embossing powder and clear embossing ink.

Step 7: Color in the astronaut with Midnight Snack, Traffic Cone, and Shady Dye Ink Pads. For best results, smudge the ink on a craft sheet, add a little bit of water, mix and paint with a paintbrush.

Step 8: On a separate piece of cardstock, stamp "Happy Birthday" and "I love you to the moon and back" sentiments with Jet Black Archival Ink.

Step 9: Fussy cut the astronaut and sentiment.

Step 10: Add a Midnight Snack Dye Ink mat to the sentiment and trim.


Step 11: Assemble the card: Use foam tape to adhere the moon to the panel, and the astronaut/sentiment to the moon. Add the completed panel to a card. Apply Stardust Stickles to the astronaut's helmet and gloves.

