by Bobbi Smith

Distressed 4th of July Card by Bobbi Smith
- Materials
- Instructions
- Dina Wakley Media Brushes
- Ranger Paper Creasers
- Tim Holtz Distress® Sprayer
- Ranger Heat it™ Craft Tool
- Tim Holtz® Waterbrush - Detail
- Ranger Mini Blending Tool
- Tim Holtz Distress® Splatter Brush
- Ranger Non-Stick Craft Sheet™
- Tim Holtz Distress® Glitter Dust
- Tim Holtz® Distress Collage Mediums: Matte
- Ranger Adhesive Foam Rolls: Black
- Ranger White Opaque Pen
- Archival Ink™ #0 Pad: Jet Black
- Tim Holtz® Distress Crayons: Black Soot
- Tim Holtz® Distress Ink Pads: Gathered Twigs, Fossilized Amber, Blueprint Sketch, Mustard Seed, Spiced Marmalade, Carved Pumpkin, Candied Apple
- Tim Holtz® Distress Markers: Hickory Smoke, Blueprint Sketch and Candied Apple
- Tim Holtz Distress® Watercolor Cardstock
- Tim Holtz by Stampers Anonymous Layering Stencils: THS008 Stars, THS003 Rays
- Tim Holtz by Stampers Anonymous Stamp Sets: Bird Crazy CMS212, Crazy Things CMS237, Mini Bird Crazy & Things CMS250
- Tim Holtz Alterations by Sizzix Dies: Thinlits- Bird Crazy, Bird Crazy Things, United States, Handwritten Celebrate
- Tim Holtz by Core’dinations Kraft-Core Cardstock: #24 Black
- Tim Holtz idea-ology: Tissue Tape, Sanding Grip
- Tim Holtz by Tonic Studios Craft Pick
- Baby Wipes
Instructions

Hi everyone, Bobbi here! I’m so happy to be with you on the Ranger Blog today! I’ll be using lots of Tim Holtz Distress product to create this fun patriotic card. Hope you can join me!
 Step 1: Cut a piece of Ranger Manila Cardstock 6.75 x 4.75. Apply thin coat of Dina Wakley MediaWhite Gesso to the manila surface, then let dry. Add a few small pieces of Tim Holtz Tissue Tape to the cardfront as an accent. Squeeze a couple drops of Pumice Stone Distress Paint onto a Non-Stick Craft Sheet, and lightly mist the paint with water. Press the gessoed side of the Ranger Manila Cardstock into the paint mixture until covered. Dry with a Heat it Tool.
 Step 2: To add more distress, pick up droplets of color off the Non-Stick Craft Sheet with the gessoed manila cardstock, blotting to pick up the color (not swiping), then drying with Heat It Tool.
Place the Rays Layering Stencil over the top of the colored manila cardfront (I like to tape mine down with a little tissue tape). Apply a couple drops of Blueprint Sketch Distress Paint to the Non-Stick Craft Sheet. Using a clean piece of Blending Foam on the tool, pick up the color and apply a little (using a pouncing motion) concentrating on the lower portion of the rays. While stencil is still in place and paint is still wet, move the color around a little with a moist baby wipe. Now remove the layering stencil and dry wet distressed paint on manila cardstock with the Heat it Tool.
 Step 3: Place the Stars Layering Stencil over the top of your colored manila cardfront and repeat the process in step 2, using Candied Apple Distress Paint. I think the Rays & Stars Layering Stencils go perfectly together for a great patriotic theme!
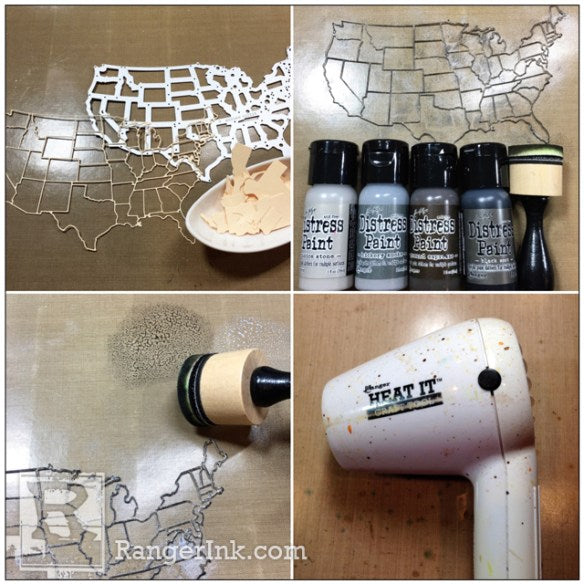
 Step 4: Die cut the United States, using the Tim Holtz United States Thinlits Sizzix die and a piece of Ranger Manila Cardstock. Pop out all of the states carefully and reserve them for another project. Apply a drop of Black Soot, Ground Espresso, Hickory Smoke and Pumice Stone Distress Paint to the Non-Stick Craft Sheet. Using a clean piece of Blending Foam on the tool, pick up the color and apply a little (using a pouncing motion) to the United States manila silhouette diecut. Then dry with Heat it Tool. Using the multiple colors will give more dimension to the final piece.
 Step 5: Apply a thin layer of Distress Collage Medium to manila cardfront. Then while still wet attach the United States silhouette/outline to cardfront and apply a second layer of Distress Collage Medium over the top. Not only am I using the Distress Collage Medium as a glue, I’m also using it as a sealant over the entire cardfront. Then set aside to air dry. This won’t take long at all. Stamp the
Bird Crazy and the Crazy Things on Tim Holtz Distress Watercolor Cardstock using Jet Black Archival Ink. Then diecut stamped images, using Tim Holtz Sizzix Thinlit coordinating dies.
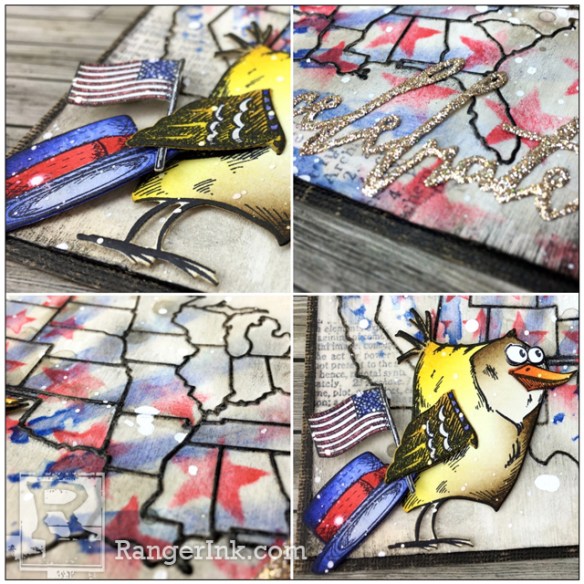
 Step 6: Stamp your Bird Crazy image onto a sticky note with Jet Black Archival Ink, then diecut using coordinating die. Cut head from body to use for a masking technique. Apply sticky note Bird Crazy body over the coordinating Distress Watercolor Bird Crazy image. Using Gathered Twigs Distress Ink and a Blending Tool with foam, gently buff color onto bird. Now remove sticky note body mask and apply head sticky note mask to Bird Crazy. Buff color onto Bird Crazy body using Mustard Seed, Fossilized Amber and Gathered Twigs Distress Inks and a Blending Tool. Remove mask and dry with Heat Tool. The diecut wing is also colored with Mustard Seed and Fossilized Amber Distress Ink using a Blending Tool. Then dry with Heat it Tool.
 Step 7: Color the beak using Spiced Marmalade and Carved Pumpkin Distress Ink and a Blending Tool. The hat is colored with Candied Apple and Blueprint Sketch Distress Inks and a Blending Tool. The fine tip of Hickory Smoke, Blueprint Sketch and Candied Apple Distress Markers were used to color the flag. * TIP* an Ranger White Opaque Pen can be used to touch up any of the white portions of the flag.
 Step 8: Smear a little bit of Black Soot Distress Crayon onto the Non-Stick Craft Sheet. Then pick up the color with finger to smear and smudge onto the surface around the states and corners of card for shading.
 Step 9: Apply a couple drops of Picket Fence Distress Paint to the Non-Stick Craft Sheet and lightly mist the paint with water. Pick up watered down Picket Fence paint with Distress Splatter Brush. Pull loaded bristles back with finger and let splatter over cardfront and Bird Crazy images. Then dry with Heat it Tool. Distress edges of cardfront with Ranger Paper Creaser. Cut a piece of Tim Holtz Kraft-Core Black Cardstock 7×10, then sand with sanding grip to expose a little of the kraft core (always protect Non-Stick Craft Sheet when sanding). Fold cardstock in half to create a 7×5 card (basic A7 size).
 Step 10: Attach card front to card with adhesive. Then assemble Bird Crazy bird with accessories, using Ranger Black Foam Adhesive. Cover a scrap piece of Ranger Manila Cardstock with a matching sized piece of Ranger Adhesive Sheet. Diecut “celebrate” using Tim Holtz Handwritten Celebrate Sizzix Die from the manila/adhesive sheet. Peel backing off top of wording to expose the adhesive. Sprinkle Distress Glitter generously on exposed adhesive then shake off excess. Adhere the glittered wording to lower right corner of cardfront using Glossy Accents as adhesive. It’s so hard to capture glitter in a photo, but boy does it ever sparkle!!!
 There you have it, now you’re ready for 4th of July celebrations! I hope you enjoyed todays card and thanks for stopping by!


